November 25, 2010
Do blogs ever end?
Sadly, most are just abandoned. However, this blog was created to document the design and building of my darkroom; and as the darkroom is essentially finished, the blog must come to an end. I plan to leave it up as a record, just without any additional posts.
November 20, 2010
Visitors
I have been working and/or out of town since that roll of film was developed. But, back in town on a weekend for a change, I had two other friend-photographers over to look at the darkroom this morning. One brought me a darkroom-warming present of some developer. Good time had by all.
There was a third visitor - a wasp! It must have come in through the air conditioner. It stayed up around the ceiling and didn't bother us. I left the poor thing in there so it could die a natural death, and later I shall dispose of the body properly.
There was a third visitor - a wasp! It must have come in through the air conditioner. It stayed up around the ceiling and didn't bother us. I left the poor thing in there so it could die a natural death, and later I shall dispose of the body properly.
November 8, 2010
Back in the saddle again …

It’s been less than a quiet week, but I got a few things done. After spending half the week out of town, then returning to a veterinary emergency and other domestic occurrences, I still managed to mix some chemistry and develop a roll of film.
In other darkroom news, the stereo is also up and running, although I haven’t hooked up the sub-woofer yet. When I got the CD player out of the closet, I couldn’t locate the power cord for it. No big deal, less than $3 at the local electronics store obtained another. This expenditure, of course, assured that I would find the original the following day!
Did a little yard maintenance, worked in the shop some, and still managed to soup some film.
Did I mention that I developed a roll of film?
October 31, 2010
The table
Got the worktable in place.
I had always intended to have a work surface in this corner. The original plan was to build it myself, just as I had built the other cabinets on the dry side. However, a couple of weekends ago my wife and I were shopping and came across one of those stainless steel work tables of the type that are in restaurant kitchens. It was the exact right size and looked perfect for the job. However, it was a bit pricy.
Since I was so close to finishing the darkroom, and this would save me several days of labor, and part of the cost would be absorbed by not having to buy materials, I inquired about the table. The question was whether or not the seller could disassemble it. No, was the answer, it doesn’t come apart. Well, I knew better, but this particular one was not going home with me.
 A little internet research, and I came up with local suppliers of similar, if perhaps lesser quality, tables for about half the price of the used one that I had seen, and they came unassembled. Bingo! A stainless and very sturdy work surface.
When I was laying out the plan for the darkroom, lo, these many months ago, this was to be a combination desk, and negative prep area. Choosing negatives, cleaning them, mounting in the carriers, that sort of thing. At the time, I was not sure if the dry mount press would go in the darkroom itself. I have since decided that the press should go in the darkroom, since its principle duty is to flatten fiber prints.
Thus, this corner of the darkroom has evolved to be the alpha and omega of the printing process. The negatives start here, and the dry prints will end up in the yet to be built print racks on the shelf beneath the table. Everything else runs in a nice clockwise motion around the room.
You would think I had planned it …
Still to be done:
PS: I recently got a "comment" on a post from back in May ("Another darkroom construction blogger"). It included a link to a darkroom blog by a photographer in France. The blog is in English. I added it to the other links page.
I had always intended to have a work surface in this corner. The original plan was to build it myself, just as I had built the other cabinets on the dry side. However, a couple of weekends ago my wife and I were shopping and came across one of those stainless steel work tables of the type that are in restaurant kitchens. It was the exact right size and looked perfect for the job. However, it was a bit pricy.
Since I was so close to finishing the darkroom, and this would save me several days of labor, and part of the cost would be absorbed by not having to buy materials, I inquired about the table. The question was whether or not the seller could disassemble it. No, was the answer, it doesn’t come apart. Well, I knew better, but this particular one was not going home with me.
 A little internet research, and I came up with local suppliers of similar, if perhaps lesser quality, tables for about half the price of the used one that I had seen, and they came unassembled. Bingo! A stainless and very sturdy work surface.
Thus, this corner of the darkroom has evolved to be the alpha and omega of the printing process. The negatives start here, and the dry prints will end up in the yet to be built print racks on the shelf beneath the table. Everything else runs in a nice clockwise motion around the room.
You would think I had planned it …
Still to be done:
- Film drying rack.
- Make a frame for the print drying racks.
- Get a new air compressor.
- Better tray storage.
- Storage for the enlarger lenses.
PS: I recently got a "comment" on a post from back in May ("Another darkroom construction blogger"). It included a link to a darkroom blog by a photographer in France. The blog is in English. I added it to the other links page.
October 28, 2010
What's left (and what's still not right)
In any project that has gone on for way over the expected time, there usually comes a point where you just get tired of it. It doesn’t matter how much you want the project to be finished, or more importantly, want the final result of the project ( a working darkroom in this case), you are simply tired of the whole ordeal.
 This darkroom is so close now, as to now be as frustrating as were all of the weeks and then months that passed while it was still so far from finished.
(Excuse the bad photoshop merge - I just don't put much effort into it.)
Where am I today? The safelights are up and wired. Testing them will be the first thing I do once I feel like putting chemistry in trays. All of the fixtures are in except for a work table. It goes where the chair is sitting under the shelves. My plan had always been to build one, but in the interest of time and not much more money, I have decided to purchase one, as previously discussed.
So, what’s left to do?

There’s really nothing that would prevent me from working; not even the absence of a “work table”. However, I learned from my father’s wisdom and experience that there was often nothing more permanent then a temporary solution. So, I really want to get everything done. Granted, I may, and probably will, change and adjust things down the road, but starting without everything right now is not the answer.
Priorities:
- I need to decide where to put up a rack to hang film to dry. (I have the rack)
- Get the heater up and running. (Also already procured – but it may get down in the 40s this week!)
- Make a frame for the print drying racks (old one didn’t survive the tear down of the last darkroom.)
- Acquire the final fixture – a work table - so that I have a place for the light box.
- Get a new air compressor (see previous blog post)
- Get a stereo receiver (this is a story all to itself – maybe a future post)
- Better tray storage – right now they’re just stacked under the long sink. Need some racks or dividers or something.
- Storage for the enlarger lenses.
October 25, 2010
Oops
For dusting negatives, I have been using an old paint compressor that belonged to my Dad. This thing is ancient and may actually be older than me. It had gotten to the point where it only put out about 40 psi - useless for paint, but perfect for dusting negs.
Like everything else from the darkroom, it has been idle for about a year and a half, but I took it into the new darkroom yesterday and cranked it up. The first time it came on, it didn’t sound right. I shut the switch off and started it again. This time, just a buzz for two seconds and then: SMOKE!
The old machine finally froze up. It’s not worth trying to fix. It has more sentimental value than anything. However, it doesn’t have enough sentimental value to keep. So long.
Now to get the smoke smell out of the darkroom and buy a small fire extinguisher.
October 24, 2010
Done! (Almost)
Water – more or less.
More in the sink – less on the floor.
In fact, none on the floor so far!
I am extremely pleased to announce that I have plumbing. One week later than I had anticipated the announcement (see prior post), and weeks (months) later than I would have liked.
I probably should have done this in the first place; but then hindsight is 20/20, isn’t it? Barely $15 worth of parts and material, and not too much time, and I had faucets like I want them. With no leaks!
 After last week’s experience of cleaning up a bit of water with the old faucets, I also was determined to test the new ones outside before I installed them in the darkroom. Hooked up to a garden hose, the only leak was in one faucet, which was just not tight enough. A half twist with a wrench and it was fine. None of the PVC glue joints leaked, although I am very paranoid about that. I had one joint leak (out of several dozen) once before, and I guess that’s it. That leak was repaired with a small amount of epoxy, so it’s never the end of the world.
 Once fastened down in the darkroom and hooked up to the water line, everything worked great! I can’t tell you what a relief that was. So different from a week ago. I made a couple of small shelf supports for the pipe and faucets. In the prior darkroom, I had attached all of this to a board on the wall, as is traditional. I did have some trouble with the PVC pipes twisting from the weight of the brass faucets, and had to get creative. This time, I decided to be “creative’ and give them some support in the way of shallow shelves. This also allowed the faucets to be a couple of inches further out over the sinks. Seems to work fine.
No hot water yet, but that was planned. The pipes are there when and if I decide to add a heater. So now all that’s left are the dozens of little things. As I’ve said, the darkroom will never be completely “finished”, since I’m always rearranging something. But, there does reach a point of stability where it is fully functional. I could actually work now, but the place is a mess and I’ll wait a bit.
Still need to put up a few more shelves; place the safelights (and test); maybe another task light or two; build the frame for the print drying racks; and, get the stereo going! Next weekend I’m going shopping for the work table. I was going to build one myself, but an analysis of time and material costs vs. just buying something has pushed me to retail. Down the road, I want to fabricate more elaborate storage for things like enlarger lenses and negative carriers, which I can’t really buy retail, but that can wait.
I’m to the point now where I can schedule the opening. Woo hoo!
More in the sink – less on the floor.
In fact, none on the floor so far!
I am extremely pleased to announce that I have plumbing. One week later than I had anticipated the announcement (see prior post), and weeks (months) later than I would have liked.
I probably should have done this in the first place; but then hindsight is 20/20, isn’t it? Barely $15 worth of parts and material, and not too much time, and I had faucets like I want them. With no leaks!

 Once fastened down in the darkroom and hooked up to the water line, everything worked great! I can’t tell you what a relief that was. So different from a week ago. I made a couple of small shelf supports for the pipe and faucets. In the prior darkroom, I had attached all of this to a board on the wall, as is traditional. I did have some trouble with the PVC pipes twisting from the weight of the brass faucets, and had to get creative. This time, I decided to be “creative’ and give them some support in the way of shallow shelves. This also allowed the faucets to be a couple of inches further out over the sinks. Seems to work fine.
No hot water yet, but that was planned. The pipes are there when and if I decide to add a heater. So now all that’s left are the dozens of little things. As I’ve said, the darkroom will never be completely “finished”, since I’m always rearranging something. But, there does reach a point of stability where it is fully functional. I could actually work now, but the place is a mess and I’ll wait a bit.
Still need to put up a few more shelves; place the safelights (and test); maybe another task light or two; build the frame for the print drying racks; and, get the stereo going! Next weekend I’m going shopping for the work table. I was going to build one myself, but an analysis of time and material costs vs. just buying something has pushed me to retail. Down the road, I want to fabricate more elaborate storage for things like enlarger lenses and negative carriers, which I can’t really buy retail, but that can wait.
I’m to the point now where I can schedule the opening. Woo hoo!
October 17, 2010
Water, water everywhere …
S. T. Coleridge wrote:

Sometime in 2008, I bought out a commercial photographer who had gone completely digital and was selling his darkroom – everything but the room itself. I got a Beseler 4x5 enlarger, several Componon lenses, trays (up to 20x24), tanks, reels, washers, timer, and a partridge in a pear tree. Actually no birds, but there was a 4 ft. temp control sink! The sink was filthy, but I cleaned it up and put it in storage, since there was no room for it in the old house’s darkroom. Someday I would expand. I sold the enlarger lenses and got all my money back, so all this stuff was, well, free.
Beware of cheap/free stuff. The enlarger and lenses were fine, actually, but much of the rest of the stuff was in various stages of decrepitude. All of the trays are/were filthy, but I still have them, just haven’t cleaned (or needed) them yet. I threw out half of the steel developing reels, since they were bent. I actually left several boxes of stuff at the guy’s studio that were in such bad shape as to only be described as trash.
Anyway, the sink, I thought at the time, was a steal. These things are expensive. This is why I held on to it even when I had no room. When fate stepped in and caused me to have to build a much larger darkroom, the sink’s true purpose was revealed.
As you can see from the photo, there is a hot and cold mixing valve, an inline thermometer, and three faucets. All of this is connected in back of the sink by standard faucet supply hoses. Now, I am thrilled to have another 4 feet of sink, and the hot/cold mechanism is just bonus – especially considering that I am not even going to have hot water initially.
The metal stand was badly corroded. (Should have been a sign.) I took it all apart, sanded and repainted, and replaced all of the connecting bolts with brass, to avoid corrosion problems in the future. The stand looks fabulous! There was a pinhole in the sink that I repaired with a little epoxy. It seems to be fine and does not leak. What I did not do, is any rehab on the plumbing. I definitely should have done a check of all this stuff before I installed it upstairs in the darkroom. When I put water to this thing, it was squirting everywhere!
OK, pulled the sink out from the wall and determined that the leak in back of the sink was in the vicinity of only in one hose, it was just a lot of water. After cleaning up the water, I re-did the connection, which appeared loose, and tried again. This time I could see the hole in the hose! Cleaned up the new water and called it a night.
Things often look better in the morning, and that morning I got a new hose and installed it. When I turned on the water, no leaks! That is, there were none that weren’t going into the sink. The mixing valve was dripping, but at least it was going into the sink and down the drain. OK, I can live with that. When I turned on any of the faucets, the thermometer leaked. OK, live with that, too. But the worst was the faucets themselves. All three leaked out of the handle when turned on and sprayed at weird angles.
The weird angles was because of the anti-siphon valves installed on the end of each faucet. Not only did these leak and reduce the water flow, but when I put a hose on one of then, there was no water at all. OK, I’ll just take them off. They are not needed. There is a set screw on the valve. The first one I attempted to remove broke off rather than turn! All of this stuff is corroded! I give up.
I am still going to use this sink! It holds water and the drain works fine. But, I am going to start from scratch as if I had just the sink and it was not already plumbed. This will be simpler and cheaper than trying to fix and/or replace all of the corroded hardware built into the sink, and will be more versatile and practical for what I need anyway. I should have done this initially, but it seemed easier just to use what was there. The mistake I made was not testing “what was there” in the first place. Oh, well. Stay tuned.

“Water, water, everywhere,
And all the boards did shrink;
Water, water, everywhere,
Nor any drop to drink.”
My version:
Water, water everywhere,
Since all the fittings leak;
Water, water everywhere,
I hate this god damned sink!
I had anticipated announcing in this blog, this very weekend, that my darkroom was fully functional, if not totally complete. It may never be totally complete, as many of us are always tinkering, but that’s another issue. However, I thought I had finished all of the plumbing and once I turned on the water, I could at least process film! This was to be a milestone! Well, it was not to be.
Sometime in 2008, I bought out a commercial photographer who had gone completely digital and was selling his darkroom – everything but the room itself. I got a Beseler 4x5 enlarger, several Componon lenses, trays (up to 20x24), tanks, reels, washers, timer, and a partridge in a pear tree. Actually no birds, but there was a 4 ft. temp control sink! The sink was filthy, but I cleaned it up and put it in storage, since there was no room for it in the old house’s darkroom. Someday I would expand. I sold the enlarger lenses and got all my money back, so all this stuff was, well, free.
Beware of cheap/free stuff. The enlarger and lenses were fine, actually, but much of the rest of the stuff was in various stages of decrepitude. All of the trays are/were filthy, but I still have them, just haven’t cleaned (or needed) them yet. I threw out half of the steel developing reels, since they were bent. I actually left several boxes of stuff at the guy’s studio that were in such bad shape as to only be described as trash.
Anyway, the sink, I thought at the time, was a steal. These things are expensive. This is why I held on to it even when I had no room. When fate stepped in and caused me to have to build a much larger darkroom, the sink’s true purpose was revealed.
As you can see from the photo, there is a hot and cold mixing valve, an inline thermometer, and three faucets. All of this is connected in back of the sink by standard faucet supply hoses. Now, I am thrilled to have another 4 feet of sink, and the hot/cold mechanism is just bonus – especially considering that I am not even going to have hot water initially.
The metal stand was badly corroded. (Should have been a sign.) I took it all apart, sanded and repainted, and replaced all of the connecting bolts with brass, to avoid corrosion problems in the future. The stand looks fabulous! There was a pinhole in the sink that I repaired with a little epoxy. It seems to be fine and does not leak. What I did not do, is any rehab on the plumbing. I definitely should have done a check of all this stuff before I installed it upstairs in the darkroom. When I put water to this thing, it was squirting everywhere!
OK, pulled the sink out from the wall and determined that the leak in back of the sink was in the vicinity of only in one hose, it was just a lot of water. After cleaning up the water, I re-did the connection, which appeared loose, and tried again. This time I could see the hole in the hose! Cleaned up the new water and called it a night.
Things often look better in the morning, and that morning I got a new hose and installed it. When I turned on the water, no leaks! That is, there were none that weren’t going into the sink. The mixing valve was dripping, but at least it was going into the sink and down the drain. OK, I can live with that. When I turned on any of the faucets, the thermometer leaked. OK, live with that, too. But the worst was the faucets themselves. All three leaked out of the handle when turned on and sprayed at weird angles.
The weird angles was because of the anti-siphon valves installed on the end of each faucet. Not only did these leak and reduce the water flow, but when I put a hose on one of then, there was no water at all. OK, I’ll just take them off. They are not needed. There is a set screw on the valve. The first one I attempted to remove broke off rather than turn! All of this stuff is corroded! I give up.
I am still going to use this sink! It holds water and the drain works fine. But, I am going to start from scratch as if I had just the sink and it was not already plumbed. This will be simpler and cheaper than trying to fix and/or replace all of the corroded hardware built into the sink, and will be more versatile and practical for what I need anyway. I should have done this initially, but it seemed easier just to use what was there. The mistake I made was not testing “what was there” in the first place. Oh, well. Stay tuned.
October 7, 2010
New link
New link to a website/blog about analog photography. He has a separate thread going on building a darkroom, complete with an 8x10 enlarger!
http://www.darkroomguide.com/
http://www.darkroomguide.com/
October 5, 2010
(D)rain barrel
 I discussed this a while back, but here’s a photo of the rain barrel turned drain barrel.
I don’t know how the 55 gallon barrel will compare. At least I can see how much water is in the barrel. If it proves to be inadequate, I can add more barrels and connect them together.
September 27, 2010
Cabinets (finally)
I am thrilled to report that the drought of activity is broken. I made significant progress over the weekend, as witnessed by the completion and installation of the enlarger cabinets.
 There are two Beseler 4x5s – one is on the adjustable stand in the center. I built two cabinets to flank the enlarger stand. The larger of the cabinets on the right holds the second enlarger. Underneath is storage for easels and possibly the print drying racks – I haven’t fully settled on that yet. The cabinet on the left will be a general work area and misc. storage.

September 16, 2010
Equipment list
I added an equipment page (link to the right) for those who care about such things.
Enjoy.
Enjoy.
September 12, 2010
OK, I promise to work harder ...
I hate blogs that get started and then just stop. Usually the novelty wears off and the blogger has lost interest. I assure you that the novelty wearing off is not the problem here. And, I apologize for the lack of progress.
I have just returned from two weeks out of town. Prior to that, it was record heat that kept me from working, coupled with the unexpected eye surgery back in June before that.
I am fully recovered from the eye thing, I'm back in town, and it's hot, but not "as hot". Plus, it is at least mid-September and the actual hotness will break soon. It always does. So, onward and upward once I get settled back in from being gone for a while.
I am inspired. One thing vacations are good for is getting one's batteries recharged. Among other things, we visited a number of photography and art venues and I got an idea for a new direction in my own photography. This makes me even more anxious about getting my own darkroom back up - as I will need it!
August 15, 2010
Some progress
It continues to be so hot as to make working in the shop oppressive! In spite of this - progress, however slow and invisible to the outsider, continues on. The track saw arrived and met expectations. Very pleased with the tool. Material for the cabinets was procured. Other jigs and devices for making the cabinets and other things have been completed, as well as the final design drawings.
And then there is all the other things that demand my time. The rest of the house can only be ignored so long and chores have caught up with me. This past week saw an electrician, a plumber, and the sprinkler repairman all visit. But, those things are fixed!
And just this Friday I had a complete physical. Seems I'm pretty healthy for my age.
I wish this would go faster, but apparently life is what happens when you make other plans.
August 1, 2010
Cabinet meeting
There are two major, “construction” things left: the water supply line to the building and fabricating the cabinets for the enlargers and the work area – the dry side.
There are still dozens (100’s ?) of small things, but that’s the last two major items. It is too hot to work outside on the water line, and I need to do some more design work on the cabinets. So, this past week I’ve been piddling around with some of the small things: where to put safelights and timers, the tray storage, chemical storage, etc. More shelves? Yes. Where? Good question.
I finally came to the realization that many of these small decisions are based, at least partly, on the cabinets. Not placement, so much, as execution. Without the cabinets in place, I can think about a lot of things, but I can’t really do them. Without the cabinets to put things in and on, I still have all these boxes sitting around, and they alter my visualization of everything else.
So: time to build the cabinets - then I can see everything! Once I put all the items in the cabinets that fit into them, I will know what I have left over that needs to go on shelves, under sinks, and other odd places. Trust me, it has to be done this way.
The cabinets are going to be pretty basic. I elected to build them myself since I don’t want doors, but rather prefer them to be open. They’ll be made out of white melamine with shelves and sliding drawers as needed. I guess they could also be considered shelves as much as cabinets. Two will serve as the dry side and will have an enlarger or two on them. The third will be in one corner and serve as a work table for miscellaneous tasks and hold the print drying racks. One of the dry side shelvinets will have purpose-built storage for my collection of enlarging easels. And so on.
Today (through the miracle of the world wide web) I ordered a track saw*, which will aid in the making of the cabinets. I had been considering upgrading my table saw for a while, but when I researched the track saws, I came to the conclusion that my present table saw will suffice, and the track saw will make cutting out sheet stock much more accurate and safer! Safer is good.
* http://ezinearticles.com/?Understanding-the-Track-Saw&id=1799306
July 26, 2010
Drained
Finished the plumbing installation in the darkroom proper. Another minor milestone, of sorts. One must take the small victories when they present themselves, after all.
I had given a lot of prior thought to how to do the plumbing, then as I was into it, had multiple second thoughts about it all. The overriding concept was to have everything exposed, both for maintenance and potential future changes. At times over the past few days, I wished I had done proper in-wall design, but I did not, so “oh, well”.
 I had planned from the beginning to have the two sinks. (see the floor plan in the Feb. 28th post) The water supply lines come out of the wall near the corner and to the left of the wet side. This location was dictated by where the lines come up from the lower floor. Once out of the wall, they move laterally along the wet side to supply both sinks.
The shorter, 4’ sink on the right has three faucets built in. The 8’ sink has no built in faucets. In the old darkroom, the long sink had 3 faucets mounted above it on the wall. I could still do this, but with the addition of the 4’ temp control sink (not present in the old darkroom) multiple faucets on the 8’ are not necessary. I have gone back and forth about even mounting a faucet on the 8’ and at this point have not, but there are stub-outs in the water line directly under the sink and I can add one at a later date. In the meantime, I plan on just having a long enough hose from one of the 3 faucets in the other sink. The longer sink is for print trays. The short sink, with it’s temperature control (given the later addition of heated water) will be for all chemical mixing, film processing, and washing.
Although faucet-less, the long sink still has a drain. Once into this, I really wished I had roughed in a proper drain pipe in the wall for both sinks. However, in the “design” stage, some months ago, I envisioned hooking up both sinks just like a double kitchen sink into the one drain. What I did not consider, was that in a kitchen sink, the two drains are about 18-24 inches apart, generally symmetrical and on the same level. In this case, the two drains are a bit over 6 feet apart, the long sink bottom is higher than the other sink, and the drain is further from the wall. So, there was a bit of improvisational engineering as I installed this. For one thing, the drain pipe was very heavy in that long of a span, and had to be creatively supported. Also, this long of a drain span needed to be off-level a bit to ensure that it drained properly. (Both would have been easily facilitated had I put it in the wall.) A “tee” and a 45 degree connection and I got it done. But, let us all learn from my mistakes!
 I did have enough foresight to put a union connection in the drain pipe between the two sinks so that either sink could be removed separate from the other for maintenance. This has already proved useful since one of the supply hoses for the faucets had the wrong fitting and I had to pull the sink back out to get to it for exchange.
The hot water side is still “prepared for”. The lines are there, but no water – yet. The hot side is capped off below the floor. If and when I put in a heater, all of the lines, electrical and space is there, waiting.
Still have to get the water line to the building and the rain barrel set up for the drain. The rain barrel has been purchased and the drain is run, just need to install and hook-up. I’ve changed my mind about the supply line, at least for now. I had intended to run a pex line underground from the main house. I may do this eventually, but for now, there is a main junction of the sprinkler system not 3 feet from the darkroom building. I am going to tap in there for the time being.
So, it will be operational as it sits, with potential changes in the supply lines, addition of hot water, and maybe another faucet all possible down the road.
I had given a lot of prior thought to how to do the plumbing, then as I was into it, had multiple second thoughts about it all. The overriding concept was to have everything exposed, both for maintenance and potential future changes. At times over the past few days, I wished I had done proper in-wall design, but I did not, so “oh, well”.

The shorter, 4’ sink on the right has three faucets built in. The 8’ sink has no built in faucets. In the old darkroom, the long sink had 3 faucets mounted above it on the wall. I could still do this, but with the addition of the 4’ temp control sink (not present in the old darkroom) multiple faucets on the 8’ are not necessary. I have gone back and forth about even mounting a faucet on the 8’ and at this point have not, but there are stub-outs in the water line directly under the sink and I can add one at a later date. In the meantime, I plan on just having a long enough hose from one of the 3 faucets in the other sink. The longer sink is for print trays. The short sink, with it’s temperature control (given the later addition of heated water) will be for all chemical mixing, film processing, and washing.
Although faucet-less, the long sink still has a drain. Once into this, I really wished I had roughed in a proper drain pipe in the wall for both sinks. However, in the “design” stage, some months ago, I envisioned hooking up both sinks just like a double kitchen sink into the one drain. What I did not consider, was that in a kitchen sink, the two drains are about 18-24 inches apart, generally symmetrical and on the same level. In this case, the two drains are a bit over 6 feet apart, the long sink bottom is higher than the other sink, and the drain is further from the wall. So, there was a bit of improvisational engineering as I installed this. For one thing, the drain pipe was very heavy in that long of a span, and had to be creatively supported. Also, this long of a drain span needed to be off-level a bit to ensure that it drained properly. (Both would have been easily facilitated had I put it in the wall.) A “tee” and a 45 degree connection and I got it done. But, let us all learn from my mistakes!

The hot water side is still “prepared for”. The lines are there, but no water – yet. The hot side is capped off below the floor. If and when I put in a heater, all of the lines, electrical and space is there, waiting.
Still have to get the water line to the building and the rain barrel set up for the drain. The rain barrel has been purchased and the drain is run, just need to install and hook-up. I’ve changed my mind about the supply line, at least for now. I had intended to run a pex line underground from the main house. I may do this eventually, but for now, there is a main junction of the sprinkler system not 3 feet from the darkroom building. I am going to tap in there for the time being.
So, it will be operational as it sits, with potential changes in the supply lines, addition of hot water, and maybe another faucet all possible down the road.
July 18, 2010
The vision thing.
Actually hit a lick on the darkroom this morning. Not much, but at least I started.
In June, I had three consecutive weeks of business travel scheduled and I knew that would put the darkroom project on hold for a bit. However, in the second week, I had some visual symptoms that I recognized from past experience. The following Monday, I visited my ophthalmologist and was promptly sent over to the surgeons. (Didn’t make the third week’s trip.)
I had surgery for a detached retina in my left eye four weeks ago. I am fine, now, but there has been all this time where my vision is effected and my energy level reduced. The vision will clear up and there should be no long term effects.
But, in the meantime, there has been six weeks total with no progress on the darkroom! Re-starting will be slow (still can’t see as well as I’d like), but at least I’m moving again.
I also apologize for not keeping up with the blog. I had an un-moderated comment from a month ago! I’ll do better. (Also, to the commenter: Sorry, but I can’t help you at this time.)
Stay tuned.
July 16, 2010
The Woodpecker
A few years ago, at the old house, there was an incident with a woodpecker who attacked rotting siding on the building housing my darkroom and my wife's studio. We had built this building on the back of our lot. The siding was an alleged high-tech engineered material that would not rot or deteriorate. Yeah, right. Note the green mold, as well as the holes.
The rot attracted the bird, and the bird drilled numerous holes. I filled the holes with expanding foam sealant as a temporary measure, and then had to cover the rotted area with cedar boards. At least the cedar matched the rest of the trim on the building and once it weathered it looked as if it had always been there. Just before we moved last year, we painted the building and it looked super ...
The incident, for some inexplicable reason, awakened the inner plagiarist in me; and I re-fashioned Poe's The Raven into The Woodpecker. See the link to the right under "pages".
Only tangentially related to building the new darkroom, but hey. Enjoy ...


June 26, 2010
Time to update the blog.
There has been no progress since the last installment. First, I was on the road on business for a couple of weeks. While I get home on weekends, invariably I have to catch up on things that were not done during the week and get very little “hobby” work in.
I was scheduled to be gone again this past week, but instead, ended up with a medical emergency. I will survive, but I am not able to work on the darkroom and probably won’t for a while yet.
I hope if you are a regular follower you aren’t too discouraged. I’ll get back to this.
I was scheduled to be gone again this past week, but instead, ended up with a medical emergency. I will survive, but I am not able to work on the darkroom and probably won’t for a while yet.
I hope if you are a regular follower you aren’t too discouraged. I’ll get back to this.
June 8, 2010
Sinks, etc.

Wow! There is a bit more room in my garage and shop now that the darkroom stuff is in the darkroom. Not 100% moved in, but mostly.
Things are a ways from being finished, of course. The plumbing is still not hooked up, although the sinks are in place, there are cabinets to build, and shelves and racks to put up. Then, placement of safelights, and a dozen or so other small things. Still, it's getting there.
EDIT: Someone left a comment asking if the printwasher is home-made. No, it is a 11x14 Versalab. The stand, I did make. I also made the stand for the longer sink.
http://www.versalab.com/server/photo/products/washer1.htm
Yes, Suzanne, it is starting to take shape. Just not done yet. I am on the road (for work) most of this month, so it may still be a while.
June 1, 2010
A milestone
I declare the "construction phase" finished!
Over the long weekend, I started moving in sinks, shelving, enlarger chassis, etc. Still a lot of work to do, but the visiable progress should be faster and the blog a little more interesting. I appreciate any of you that have actually followed this since February. You must be bored.
Some panos:


Over the long weekend, I started moving in sinks, shelving, enlarger chassis, etc. Still a lot of work to do, but the visiable progress should be faster and the blog a little more interesting. I appreciate any of you that have actually followed this since February. You must be bored.
Some panos:
I own a swing-lens panoramic camera. I had never shot color film in it before until I decided to do some documentation of the darkroom construction. I had to wait until I finished up the roll and then got it processed. (No irony there ...)
I am just not very practiced at scanning and I am afraid that the results are disappointing. Never mind the color balance from the different lighting. But here they are anyway to show some before and after. I had even less luck stitching digi shots (see Feb 15 post on the blog), but this is still not much better than rough illustration. Oh, well. My analog printing is much better and that is why I'm building the darkroom!


May 28, 2010
Trim carpentry
The last of the things that need paint – with any luck.
The baseboards went fairly smooth. There was one piece that had to be scribed and cut on the bottom edge due to an inexplicably high hump in the tile floor. There were several other places where the tile wasn’t perfectly level (it never is) but not enough that caulk wouldn’t hide it.
 There is the usual trim (casing) around the door, and then some molding where the new drywall comes against the old drywall in the slanted ceiling at a 45 degree angle. Rather than trying to get fancy with a taped 45 degree joint, I concluded that molding would be the ticket. Why not?
With this, it truly is a big, empty white room!
The baseboards went fairly smooth. There was one piece that had to be scribed and cut on the bottom edge due to an inexplicably high hump in the tile floor. There were several other places where the tile wasn’t perfectly level (it never is) but not enough that caulk wouldn’t hide it.
With this, it truly is a big, empty white room!
May 24, 2010
Window Pain
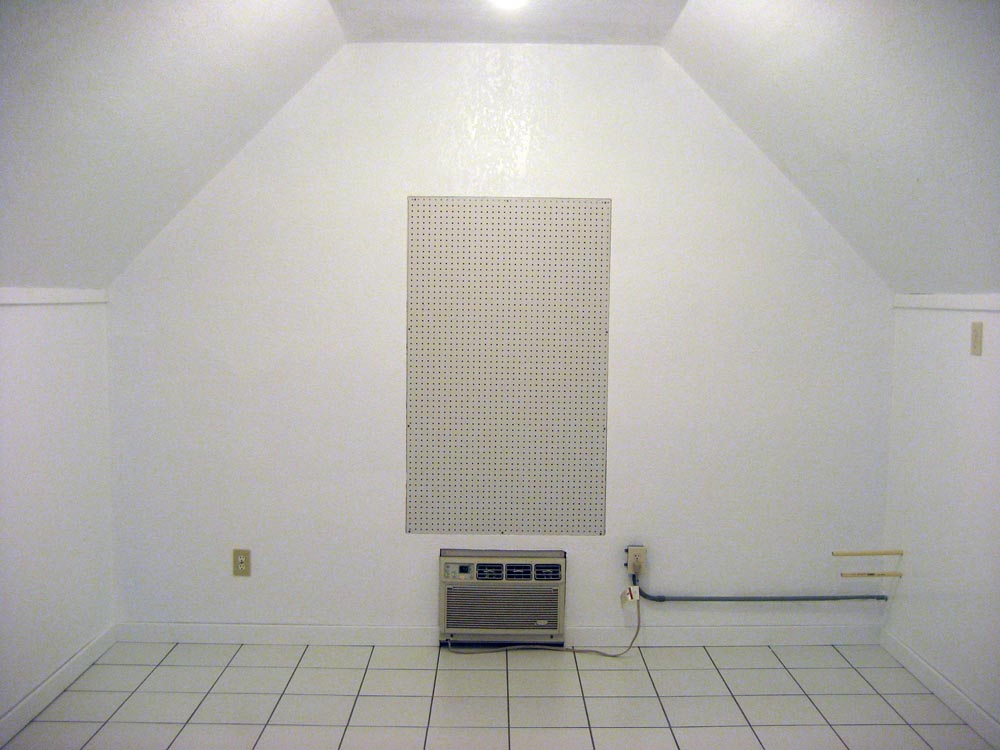
 All of us that have used temporary darkrooms (baths, laundries – you know who you are) have likely dealt with a window or two. Curtains, blinds, paper, bath towels, cement. I personally prefer aluminum foil and tape. This darkroom will be more or less permanent, or at least “dedicated”. The idea is that when and if we decide to sell the house, the room will be restored back to just a room. For some reason, having a darkroom is not the selling advantage it used to be; yet a “bonus room” is.
My original plan was to have some air space between the two layers of foam (giving a tiny bit more insulation) and then a piece of paneling or drywall to finish out the opening. A picture frame molding around the outer panel and voile’. But while at the home center, the obvious alternative was sitting right there in the building materials bins: pegboard! I have always used pegboard in the darkroom for hanging reels, negative carriers and other such tools. I decided to substitute pegboard for the outer panel. This also led me to place the two foam panels together to allow enough space behind the pegboard for the hooks to clear.
The result was more than satisfactory, and can be turned back into a working window with minimal effort and some touch up paint.

May 23, 2010
In the White Room
Painting is finished - almost! There are a few trim carpentry things left and then some touchups on nail heads and the like. A little caulk, a little putty, and done.
Right now, everything is white. It is really, really white! I'm looking forward to getting the fixtures in just to keep from going snow blind ...


Right now, everything is white. It is really, really white! I'm looking forward to getting the fixtures in just to keep from going snow blind ...


May 16, 2010
Drywall
I hate drywall. I consider it a necessary evil. When I built the last darkroom, it was part of a larger out building that contained my wife’s studio and some storage. I did all of the interior construction: electrical, plumbing, drywall and paint. A few years later, we remodeled a bathroom. The contractor I ended up hiring would do everything except finish the drywall and paint. Heck, I can do that!
Well, I did, but I had forgotten what a pain it is and how much I hated it when I was finishing the out building. A year after this, we did more remodeling, with the same contractor, and I found a good drywall/paint guy. I swore I would never do sheetrock again. I even had this same man back to do some work to sell the old house and a little at the new house.
However, the darkroom is an effort at saving money, so here we are. The drywall is all up, taped and bedded, sanded and ready to paint – by me! We have had high humidity all week and actual rain yesterday. No rain today even thought there was a 30% chance. Rain is in the forecast for the next several days. Of course, working on the darkroom is indoors and out of the weather, but the moisture is not helping. Just takes longer for things to dry.
I had hoped to have the painting done by the end of this weekend. Didn’t happen. Oh, well. Still, I will mark the final clean-up of the paint brushes as the end of the construction phase! It’s an arbitrary and probably meaningless milestone, but I’ll mark it anyway. From here, it is the installation of the fixtures. Oh, wait, there's the window ...
May 8, 2010
Score!
The current enlarger inventory includes a Beseler 4x5, and an Omega 4x5. Both acquired inexpensively. All kinds of carriers and do-dads for both.
I went out today and picked up another Beseler 4x5 chassis! I already have two heads (dicro and condenser), and had planned on switching them out (fairly easy with a Beseler). A young film photographer had put one on Craigslist because he was cleaning out his stash. Once I got there, I also picked up two Kodak "D" safelights!
Now, I may have the Omega D5 with a Chromega head for sale. Two enlargers is one thing, but three 4x5s is too much even for me. With the Omega and some accessories I could sell separately, I should more than get my money back.
Life is good - but back to work.
May 2, 2010
Another darkroom construction blogger
Another local photographer that I know is also building a new darkroom (his 4th) and has decided to blog the effort. It is an interesting project (beyond just being a darkroom) because he is building "portable". Having had to move residence several times, he tired of starting over each time with a darkroom, and so is converting an old travel trailer that he can take with him - not to mention "on location" one would suppose.
Anyway, here's the link: http://notamethlab.wordpress.com/
I've also added a link on the Other Links page to another photographer whom I "know" only on the internet. She, too has been blogging construction of a darkroom, and is finished!
Anyway, here's the link: http://notamethlab.wordpress.com/
I've also added a link on the Other Links page to another photographer whom I "know" only on the internet. She, too has been blogging construction of a darkroom, and is finished!
Work continues
I want to update the blog at least weekly, whether there is much to illustrate or not. There is some more drywall finishing and paint prep, and then paint will go up. More wiring is in and all that's left is the overhead lighting. Much work has been done in the stairwell leading up to the darkroom: drywall, lighting, etc.
I have chosen to paint the ceiling before I complete this wiring since I am doing it with exposed boxes and conduit that will go over the painted surface. I'm concentrating on this so that I can get lights up - at least temporary ones - in order to make the remainder of the work easier. Right now, there are no lights in the room and I am using temporary work lights mounted on a stand. Serviceable, but not ideal, and I keep waiting to trip over the stand or the cord.
Here is the completed wall vs. the plan:


It is in this wall that I have made a mistake, although one I hope shall have little consequence. The plan is to scale for the most part, if not absolutely precise. (The stud placement and the dimensions are right enough, but you can see that the doorknob and the electrical boxes are more freely represented in their placement.) If you look very closely, you may perceive that the door on the plan is wider, and it is. I had planned for a 36" door. I ended up with room for only a 32" door. Also notice the added strip of drywall between the old sheet rock of the existing wall and the door. Here's what happened:
As reported in the post on March 26, I had to replace the stud at the end of the existing half wall since it was so warped. Instead of actually replacing the stud (as depicted in the plan), I simply cut it off and attached the new one to the side of the old. This added an inch and a half. Then, in framing for the door, the new stud became the "king" stud, and an additional 2x4 was placed as the "jack" stud. The jack studs are required to support the header above the door. Anyway, I had now added 3 inches and a 36" door would no longer fit. My mistake was not thinking far enough ahead to shorten the existing half wall in order to leave enough room to frame for a larger door. Oh, well.
The wire coming out near the top of the wall is for the overhead lights and a ceiling fan. It will enter a yet to be installed junction box and go on up to the conduit for the lights on the ceiling. This all happens, of course, after the ceiling is painted.
April 25, 2010
It’s a room!
If not yet dark.
Visible progress is slow but I feel I’ve reached a milestone with this: the new wall and door are in and the room is sealed up and insulated. It’s amazing how much better the air conditioner works! At the other end of the room, the window needs to be covered up, but that shouldn’t take long.
Finishing the tape and float on the sheetrock and painting is the next major phase. This takes a certain amount of time no matter hard one works at it because things have to dry. I’m going to go with your basic white on the paint color. There is much debate on various boards about what color to paint a darkroom, but it really comes down to what an individual wants. There is a school of thought about black walls, especially around the enlarger. I intend to address this later, but the room will be painted white.
After paint: overhead lighting and plumbing. Then I begin to install actual fixtures and equipment. The 8 foot sink is already in the room, since I had to get it inside before I framed and installed the door. Otherwise, it would have never turned the corner at the top of the stairs.
I also had a 9 foot countertop from the old darkroom. Nothing special about it except I had it and it was drilled and tapped for mounting an Omega 4x5 enlarger. It is not an actual “countertop”, but a heavy exterior door that I rescued from a trip to a landfill. Veneer over one and a half inch thick particle board! Weighs a ton. Flat. Stable. I also wrestled this thing up the stairs prior to framing and installing the door. I got all the way to the top landing and was negotiating the turn to take it into the darkroom when it slipped out of my grip and fell flat back onto the stairs. It hit nothing and damaged nothing in the seemingly slow-motion fall, but broke into two almost equal pieces when it hit. The two pieces were much easier to take back down then the intact thing was to haul up!
April 19, 2010
Update
Back from working out of town. Rain all weekend and tired from the trip, but I still managed to get some work done. Got the remaining sheetrock up on the wet side and started taping and bedding. Also took down the fluorescent fixtures. (Some of you were concerned).
This evening I am going to go purchase the door, so that I will have it for precise measurements. Next step is to frame the door in the added partition, then put the wiring in the new partition before closing up the wall and actually installing the door. Then, all the sheetrock can be finished and painting started. This is all a lot of physical work, but nothing too complicated.
Wiring for the ceiling lights - and a ceiling fan - will be surface mounted. What little attic space there is above the ceiling is not accessible and so trying to fish wires is just too much effort. I can live with conduit and boxes. It is a darkroom after all. Plus, if I ever want to change anything, it makes the wiring "modular", or at least accessible and changeable. The plumbing will be the same way.
We have two light fixtures in the house that are coming down (eventually). One is in the wife's studio and is a small pool table sort of light. Since, of course, she doesn't have a pool table in her studio, I think it might work as a work light over the area where I will have a desk/worktable space.
The other is a bit more whimsical. There is a chandelier in the dining room. We are not using the "dining room" as a dining room and so have always planned to replace the light with a ceiling fan. I could put the chandelier in the darkroom. As opposed to throwing it out, why not? We'll see.
I'm really motivated to move this along now, as I am anxious to get back to developing and printing. I spend way too much time thinking about buying a DSLR, and I have to get back into the chemicals or I am going to give in!
April 5, 2010
Floor is done

April 1, 2010
Travel
I was afraid of this. My employer insists that I go out of town for two weeks and do some work. It's not that this isn't a great time of year to go where I'm going (Washington DC), but it would also be a great time of year to be home and get some work done at the house (and the darkroom). Sigh ...
The tile man is laying backer board as I write and should have the floor finished by Monday. This means I can't work on the darkroom over the weekend, but I hadn't planned to anyway, what with Easter and all. But then, it will be two more weeks before there's any progress. Sigh ...
The tile man is laying backer board as I write and should have the floor finished by Monday. This means I can't work on the darkroom over the weekend, but I hadn't planned to anyway, what with Easter and all. But then, it will be two more weeks before there's any progress. Sigh ...
March 29, 2010
Tile
 The tile man is here today working on my rear patio, and he will return later in the week to tile the darkroom floor! Things are moving along.
I finished the rough plumbing in the wall and the remainder of the insulation except for where I will eventually put the door. Sheetrock is next, then paint, and it will be a room! Oh, yeah, well, there is the door, and the overhead lights, and the remaining electrical, and building cabinets, and …
March 26, 2010
Building walls
The room itself is finally taking some shape and the actual dimensions (12x18 ft) are much more apparent. Between my mishap a week ago with the trees and the weather over the weekend, nothing much got done last weekend. But, this week so far: got the drain in, finished the wiring for the outlets, and put up the insulation. Last night, I got into the carpentry phase and framed most of the new partition where the door will be. It is not finished, because I need to leave a larger opening than just the door so that it will be easier to get the drywall up the stairs and into the space.
 There was an existing half wall on the end of the room by the stairs. It was there to keep one from falling down the stairs, obviously. The plan was to completely close in that end of the room with a partition and a door. See the “plan”.
There was a bit of a kink in the proceedings. (Isn’t there always?) If you look closely at the “before” picture, there is a long stud going up from the end of the existing half wall to the ceiling. While no 2x4 stud is ever completely straight, this one had a curve befitting a belly dancer. From the top of the half wall to the ceiling, it curved nearly 2 inches out of plumb. Since it was to become the “king stud” for the door, that would not do. So, it had to be replaced. Not that big of a deal, except that I could only get so close to the ceiling with a saw (without tearing up the ceiling itself) and so had to chisel out the last inch of the wood. Didn’t take long.
There is an outlet just outside the planned door that will be relocated into the wall to the right of the door and will be on both sides of the wall. I’ll run an extension of this circuit over to the center of the “existing” wall, as well. A separate circuit will then be run from the breaker box below up through this partition, with switching just beside the door, and into the ceiling for general lighting. One commenter on an earlier post warned about the fluorescent lights that are currently in the space. I do plan to take them out. They may or may not “glow” as these types of lights are reported to do. What they do, however, is hum, and loudly. Plus, the existing switch for them will be on the outside of the darkroom, once the door is in. Can’t have that, either. So, new circuit and new lights.
Alas, the plan shows a 36” door. After measuring more carefully, there is only room for a 32”, or maybe even only 30” because of the slant of the ceiling. This shouldn’t make any difference in the long run. It’s not like I’m going to be moving stuff in and out all the time. I’ll just have to make sure that some things, like the 8 foot sink and my 9 foot dry side countertop, get up there before the door is installed. It could get tough turning that corner, just like with a sheet of drywall.


March 21, 2010
What hard hats are for ...
So, anyway, a few days ago I was out on my lot pursuing my latest involuntary hobby: cleaning up storm damaged trees. This is the main thing slowing progress on the darkroom. Well, and the weather. Spring will be here any week now. But, I digress ...
We have several dozen ash junipers on our little acre, and a number of them did not do well in the heavy snow we had last month. Little by little, I’m getting them cleaned up.
I have both a gas chain saw, and a small electric one that is on a pole – for reaching small limbs off the ground. I know how to use them. I do not work on ladders, I leave that to the pros. In fact, this incident happened while I was standing flat on the ground, cutting at about waist high. I was not, repeat, not, standing under anything.
Something – and I still do not know what – hit me on top of the head. It wasn’t that heavy, did not knock me out or even hurt much. However, I was aware that I had been cut. I stopped the chain on the saw and set the saw down and started walking up to the house when the blood started pouring down my safety glasses. Yes, I was wearing safety glasses, gloves and hearing protectors, but not a hard hat. I had no idea that a scalp wound would bleed so much.
I walked calmly (yes, calmly) back to the saw and shut the motor off, then up to the house and yelled the wife’s name. She (fortunately) came right out and did a really good “Oh my God!” We got the bleeding stopped quickly enough but she insisted I go to the emergency room and I could not convince her to take a picture of me before we left. Blood was dripping everywhere. I bet I looked cool.
Anyway, I now have two staples in the top of my head right where I don’t have near enough hair to cover them up. They come out Wednesday. No concussion, no bruising, just a nasty cut that could have been prevented with a $5 hard hat. I now own one. I’ve seen where the real hard hat guys usually have their names stenciled on theirs. You know, something appropriate like “Randy” or “JD”. I think I’ll stencil “Dumbass” on mine.
March 14, 2010
Bits and pieces
Interesting thing on the plumbing. On one of the online forums, another darkroom builder was discussing his lack of a drain. As is always the case, he got a lot of suggestions, but one was a device I didn’t know about and would have been perfect for my last darkroom. It was an integrated tank and sump pump built specifically for an application such as having a laundry sink in a basement and needing to drain it up to the house drain. I could have used such a device at the old house instead of the holding tank and pumped to the main house drain only about 20 ft away. Oh, well.
Unfortunately, this specific device won’t work at the current house. I’m too far from a house drain (100’s of feet), plus I’m on a septic now, and why take that chance? But, it does give me an idea for using a simpler sump pump to move the waste water out to the garden. Stay tuned.
March 8, 2010
Electric weekend!
This week just did not turn out as planned. A brief flu-like bout mid week – got over it about as fast as it came on, but it subtracted an evening or two I meant to spend on the darkroom. That setback not withstanding, I had this weekend all planned out. Saturday was to be spent doing yard work; Sunday on the darkroom.
The yard work went as planned. This is the project that is slowing down the darkroom progress. It’s not standard yard work. We had snow damage (yes, snow damage) to many, many trees on our semi-rural lot, and I am slowly getting the cleanup taken care of. I would much rather be doing something else, but it’s gotta be done. I could have hired an arborist, but, believe me, it would have been thousands of dollars! However, I digress …
Got a good deal of wiring done. Not much to show in a picture, so I won’t bother. Dry side is ready to close-up. The wet side could be done, but I’m still unsure about the placement of a couple of things, so it’s still in flux. Still thinking about the overhead lights, too. I have always thought that the darkroom lights should be track lights, then they would be very flexible and easily changeable, especially the safelights. I may end up with the safelights on tracks, but not the general overhead task lighting. I just need to make some decisions. I’m trying to wire (and plumb) for future considerations, but that is not always completely successful. Anyway, sheetrock is coming soon and then things will really start to take shape.
I’ve got one wall to frame. The stairwell from the floor below is open to the second level. Easy enough, but I am having to take wiring into consideration for that, too; since the new partition will have the darkroom door, and, of course, light switches!
February 28, 2010
Power to the darkroom!
I’m referring to electrical power, of course.
The good news is that the outlets in the upstairs darkroom are already on a separate breaker from the downstairs shop. The lights are not, but they are going to be redone anyway. At least I can shut off the breaker to the outlets and still have light to work for now. In any event, the darkroom will untimately be on its own circuits.
The bad news is that I am going to make changes and tracing the wiring is going to be a bit of a challenge. But, I’m up to it. I have enough experience at this sort of thing and know where to find out what I don’t know. I won’t be starting any electrical fires. After the mess with the floor, working on the electrical will be almost a break.
Right now, the outlets are at the usual 16-18” off the floor, and spaced out about 12’ apart – all to code. In addition to moving half of the existing outlets, I’ll add a few more. (Almost can’t have too many.) I’ll put the new and relocated outlets about 4’ off the floor, so that they will be above countertops and sinks, much as in a kitchen.
Lighting - safe and otherwise - is still in the design stage. And speaking of the design, here’s the current working drawing:
EDIT: (3/18/10) The door will open to the outside.
EDIT: (3/29/10) Or, maybe not.

February 21, 2010
Carpet
One of the first steps in the darkroom construction was to pull up the carpet. I mean, who has carpet in a chemical darkroom? (I’m sure someone does …)
 So, I make the first cut and attempt to pull up a corner. Oh … my … god! It’s glued down! Who glues carpet to a floor? (I’m sure someone does …) I got it up, but I had to develop a technique that involved cutting much smaller strips. A lot more cutting, and a lot more work. This one hour job ended up taking about 5 hours!
And, on top of that, now I will have to put something down over the sub-floor, since I will never scrape all the glue up. If I decide on tile, no problem. I’ll just put the backer board down over the glue. But, I was thinking of sheet vinyl – the “no glue” type. May have to re-think. Stay tuned.
I haven’t gotten much work done on the project since the blog was started due to other priorities. I won’t elaborate here, just take my word for it. Anyway, I had set aside today to pull up the carpet. Pulling up carpet is pretty straightforward. Make some cuts so that it can be rolled up in manageable strips, and roll up the strips. The hard part is pulling up the tack strips if you’re not putting down new carpet. I was prepared for this since I’ve done it before.
 So, I make the first cut and attempt to pull up a corner. Oh … my … god! It’s glued down! Who glues carpet to a floor? (I’m sure someone does …) I got it up, but I had to develop a technique that involved cutting much smaller strips. A lot more cutting, and a lot more work. This one hour job ended up taking about 5 hours!
February 18, 2010
Hot Water
I’m not sure what to do about hot water.
If anything.
I’m in Texas. The problem here is that the tap water is often too hot, rarely too cold. I was fortunate at the old house to never have the water coming out of the tap at such a temperature that it would reticulate film, but I have heard such tales. I must have been far enough from the water tower that the water cooled running underground to the house. I expect much the same in the new house.
My prior darkrooms had not had any heated water until this last one. When I built it 12 or so years ago, I installed one of those two gallon (yes, 2) little water heaters that plugs into 110V. It quickly proved to be useless. Maybe it was too small, or maybe it suffered from only being turned on intermittently, but it was disappointing. Eventually, an old microwave made its way to the darkroom and served very well for heating water to mix chemicals.
So, is hot water needed? Not always needed, but helpful when it is needed. (Such as for cleaning up.) It has been suggested in a comment to a prior post to use an immersion heater for making enough water for mixing chemistry. The microwave takes care of that. It is also been suggested to get a standard tank heater and that is a very practical approach. This time I would put in a 20 gallon, however, now that there’s room and I can get 220V to it. The other alternative is a point of use heater. This would not store and maintain hot water when I wasn’t using it.
The point of use option is the most expensive, but if I could find the right unit, it could be the most efficient and effective. I say “could” since I have heard both good and bad things about them, so I need to do more research.
But, I have made an interim decision: I am going to “plan for” a hot water side when laying out the plumbing, but I will not install a heater, yet. At a later date, I can put in a tank or tankless, or do nothing and be cold only.
February 15, 2010
Where to start?
The start of any project is the planning. This plan starts with getting to know the space.
In back of our house is another building that is essentially a garage. The roof is pitched at 45 degrees and has a semi finished attic. The footprint of the garage is 18 x 22 feet. Because of the pitch of the roof, the attic is very tall and fortunately built with no rafters in the way. Two knee walls narrow the useful area to about 12 x 22, and with the stairwell taken out of that, the darkroom ends up being about 12 x 18, or 216 square feet. Considering that my prior darkroom was 7 x 9 (63 sqft), this is over triple the area!
The previous owner (or builder) had started finishing the space, as it was obviously built to be finished out, rather than as a standard attic. For one thing, there is a floor. If this had been intended strictly as a garage, shop or storage building, there would have no doubt been open rafters. So, the space is floored, and an actual stairwell up to it. And, there’s a window. The window is not a plus for a darkroom, but it will be dealt with. I suppose the intention of the builder could have been simply for second floor storage, but it just seems too well done for that.
There is some insulation, some drywall, (both unfinished) knee walls that are only framed and some really awful carpeting. There is a window air conditioner. The room had exercise equipment when we viewed the house while it was on the market. It was maybe a “man cave”, but no evidence of cable TV.
 Of course, the gym gear is gone. I had hoped to leave the space empty until I got to work on it, but I had too much darkroom gear, including sinks and the like, so some of it ended up there for storage. It will all come out once actual construction starts.
The givens are that the carpet comes out, and the knee walls will be properly insulated, sheetrocked and painted. The lighting and the electrical will have to be re-done. The window unit will, at least, be replaced with one that both heats and cools; and depending on budget, I may get something fancier than a window unit. I know that a lot of darkrooms are not climate controlled and the users make do and just work when it’s tolerable. But, I have found that never having to worry about temperature and being able to use the darkroom comfortably at any time is as much a luxury as just having a darkroom.
Then there’s the plumbing. No plumbing in this building. Getting water to it is not a large issue, I can “tee” off an outside faucet and run a line underground. It’s the drain that is the problem to solve. In the old house, the darkroom was also in a separate building behind our house that was not plumbed (sound familiar?) Again, running a water line from an outside faucet was no problem. I ended up running the sink drain into a stock tank located under the building. Periodically, I drained the tank and used the grey water on the lawn. Not ideal, but there was no easy (or cheap) way to get to an actual drain, so this worked.
A similar arrangement will be used at this parallel situation at the new house. The only difference is that I won’t have the holding tank under the building since it is a slab. It will be to the back side (out of sight) and look like a rain barrel. It may, in fact, be a rain barrel. Fortunately, the new darkroom is on the second floor. At the old house, it was on the first floor, so having the tank under the floor was a plus.
Other than these things, the planning is still on-going. I tried making a floor plan and scale cut-outs of all the fixtures: sinks, enlarger tables, etc., and doing a “plan” this way. But, it was just too hard to visualize. So, I’m working full size and 3-D. At this point, I have the sinks set up and the biggest enlarger set up temporarily to decide the layout. This has been beneficial in a number of ways: not the least of which is I was able to confirm that my idea for running the drain outside to the rain barrel is feasible. I also discovered that because of the slope of the ceiling, placement of the enlargers needs to be considered from a vertical standpoint, too. Would have never known this from a floor plan. Still undecided on heated water. That one decision is enough for a later blog.

In back of our house is another building that is essentially a garage. The roof is pitched at 45 degrees and has a semi finished attic. The footprint of the garage is 18 x 22 feet. Because of the pitch of the roof, the attic is very tall and fortunately built with no rafters in the way. Two knee walls narrow the useful area to about 12 x 22, and with the stairwell taken out of that, the darkroom ends up being about 12 x 18, or 216 square feet. Considering that my prior darkroom was 7 x 9 (63 sqft), this is over triple the area!
The previous owner (or builder) had started finishing the space, as it was obviously built to be finished out, rather than as a standard attic. For one thing, there is a floor. If this had been intended strictly as a garage, shop or storage building, there would have no doubt been open rafters. So, the space is floored, and an actual stairwell up to it. And, there’s a window. The window is not a plus for a darkroom, but it will be dealt with. I suppose the intention of the builder could have been simply for second floor storage, but it just seems too well done for that.
There is some insulation, some drywall, (both unfinished) knee walls that are only framed and some really awful carpeting. There is a window air conditioner. The room had exercise equipment when we viewed the house while it was on the market. It was maybe a “man cave”, but no evidence of cable TV.

The givens are that the carpet comes out, and the knee walls will be properly insulated, sheetrocked and painted. The lighting and the electrical will have to be re-done. The window unit will, at least, be replaced with one that both heats and cools; and depending on budget, I may get something fancier than a window unit. I know that a lot of darkrooms are not climate controlled and the users make do and just work when it’s tolerable. But, I have found that never having to worry about temperature and being able to use the darkroom comfortably at any time is as much a luxury as just having a darkroom.
Then there’s the plumbing. No plumbing in this building. Getting water to it is not a large issue, I can “tee” off an outside faucet and run a line underground. It’s the drain that is the problem to solve. In the old house, the darkroom was also in a separate building behind our house that was not plumbed (sound familiar?) Again, running a water line from an outside faucet was no problem. I ended up running the sink drain into a stock tank located under the building. Periodically, I drained the tank and used the grey water on the lawn. Not ideal, but there was no easy (or cheap) way to get to an actual drain, so this worked.
A similar arrangement will be used at this parallel situation at the new house. The only difference is that I won’t have the holding tank under the building since it is a slab. It will be to the back side (out of sight) and look like a rain barrel. It may, in fact, be a rain barrel. Fortunately, the new darkroom is on the second floor. At the old house, it was on the first floor, so having the tank under the floor was a plus.
Other than these things, the planning is still on-going. I tried making a floor plan and scale cut-outs of all the fixtures: sinks, enlarger tables, etc., and doing a “plan” this way. But, it was just too hard to visualize. So, I’m working full size and 3-D. At this point, I have the sinks set up and the biggest enlarger set up temporarily to decide the layout. This has been beneficial in a number of ways: not the least of which is I was able to confirm that my idea for running the drain outside to the rain barrel is feasible. I also discovered that because of the slope of the ceiling, placement of the enlargers needs to be considered from a vertical standpoint, too. Would have never known this from a floor plan. Still undecided on heated water. That one decision is enough for a later blog.

Why blog this?
I initially decided to blog the construction of my new darkroom simply to record the process in case the information and my experience could be useful to someone else.
I frequent three different photography web forums which all have discussions of darkroom related matters to varying degrees. One, APUG (Analog Photography Users Group) http://www.apug.org/forums/home.php, is devoted entirely to analog photography. APUG has a thread with pictures of different members’ darkrooms. This thread has proved valuable to some when contemplating creating their own darkrooms. Doing this blog takes that a step further by documenting the whole process.
Lately, though, it’s taken on a new, personal motivation. We moved into this house last April. It’s February and so almost ten months have passed and I have yet to really start on the work. First, we had to move and get the new house up and running. Then, I changed jobs in August – same employer, but slightly different duties and much more travel. Then, after adjustment to the new job settled down, it got to be late Fall and now Winter and it’s just too unpleasant to work in a raw space.
Well, it’s time! Not only have I not had the darkroom to work in, but I have taken very few pictures in the interim and the black and white film I have shot is sitting unprocessed on my desk. I’ve got to get back to photographing. I could set up a temporary way to work in one of the bathrooms, but I made a deliberate decision not to do that because I feared it would delay the permanent space that much more. My fear goes back to something my father always said, and I agree: “there is nothing more permanent than a temporary” solution.
At this point I may have to compromise (with myself) and at least process film, but not print. Also, I am going to get back to shooting more color, which will be processed by the lab, anyway. We’ll see.
In any event, I have vowed to get to working on the darkroom and will use the blog to keep myself motivated. No one wants to read a blog that hasn’t been updated in months!
Atrum Cella Novus
This is a blog to record the building of my new darkroom.
Now, as everyone knows, film is dead. Everybody is digital. This has been widely reported on the internet and in the newspapers. Not unlike the fact that barbershop singing, tube amps, and V-8 engines no longer exist.
Professional photographers who have not already converted to digital are dismantling their chemical darkrooms faster than high-schoolers are learning to text while driving. Amateurs, or at least casual shooters, no longer have the need to develop and print their own pictures. In fact, the do-it-yourself market probably peaked decades ago about the time one hour labs appeared in every drug and grocery store.
Also dead are camera stores. The few remaining ones can hardly compete with the electronic big boxes and other stores that sell digital cameras alongside the computers, printers, and plasma TVs. Besides, most camera stores made their money on processing and printing film, and that has all but gone away.
None the less, and to the astonishment of many, (including a huge proportion of camera salespeople) photo chemicals are still made and sold. Film and paper is still available, and so are tons of used (and new) cameras and darkroom equipment. Everything a film photographer needs is available through the digital instantness of the internet. No irony there.
So, what about this darkroom business? Why would one bother with the time and trouble and the smelly chemicals? There are those of us who remain in the darkroom for a number of reasons, but the main one has to be that we simply enjoy it and prefer the process over others. Nothing against the new technology (“some of my best friends …”)
Here’s the deal: we have moved into a new house and I am faced with the prospect of “having” to build a new darkroom.
I have had a number of dedicated darkrooms in my life, and the usual number of temp set-ups in bathrooms, laundries and kitchens. The first real darkroom was just after I got out of college and I rented a house that actually had a darkroom. However, it had no plumbing, heat, or AC. It was, however, a small, windowless room with no other purpose. Well, the heat and AC was easy. I added a heater and an air conditioner. The room shared a common wall with the laundry, so putting in a sink was easy, too. My landlord, who had built the darkroom, was more than happy to let me spend my money to do this.
Another rent house, after I got married, had a storeroom that was like-wise converted, but then un-converted when we moved out.
 I built a darkroom for my employer at one point, and I then did the in-house photographic services for the company for a few years. It was spartan and had many compromises, but it worked and was a refuge for me since no one else dared go in there.
About 12 years ago, I got to build the home darkroom. We were going to add on to the house to give my wife, the artist, some studio space, and me getting a darkroom in the process was part of the deal. Great. We’re also now a bit older and “have more insurance” as they say, as well as a bit of disposable income, so I did it right. Real darkroom sink, central heating and AC, the whole banana. Except that I made it too small. 7 x 9 feet. Oh, well.

But, we have sold that house. (Another darkroom un-converted.) One of the reasons we bought the new house was because there was a perfect room for my wife to have an even bigger and better lighted studio, and a space where I could do whatever I wanted to. Ta Da – a new darkroom.
Subscribe to:
Posts (Atom)